Tuesday, November 26, 2013

DIY Mini Chalkboard Place Cards


I wanted to share a little more of the process for the chalboard place cards I made for my Thanksgiving tablescape yesterday, in case you'd like to make them too. I know you can purchase little easels pre-made, but doing a little work yourself can make this project way more affordable. I purchase 3 of the 1/4" square basswood sticks (24" long) and one sheet of 1/8" thick x 3" wide x 24" long basswood.


I began by cutting the sheet of basswood into 6 pieces at 4" lengths. I didn't need more than an exacto blade to do this.


Then I cut the sticks into 4" lengths with one straight edge and one angled edge.

This is the way I made all of my cuts for the stick. Not to scale, obviously.

For 1/3 of the sticks, I cut them each about 3/4" shorter than the rest. These would be the legs that allowed the chalkboards to tilt back a bit.

Then I painted all the pieces with gold leaf (or gold spray paint, or whatever floats your boat), not worrying about the front sections of the chalkboard too much, since they'd be covered up soon anyway.


Next, I taped off the edged of the fronts of the chalkboards  and then gave them two light coats of chalkboard paint.

Once they dried, I peeled off the tape and touched up any spots where the black paint bled onto the gold.


Then I hot glued two legs to the back of each chalkboard.


And finally, I wedged the last shorter legs into the space between the two glued pieces. I opted not to glue these into position permanently so that it would be easy to store these away between uses.

And that's it. Pretty simple, right? And such a cute detail for your dining companions!


Sunday, November 24, 2013

A Natural Thanksgiving Tablescape


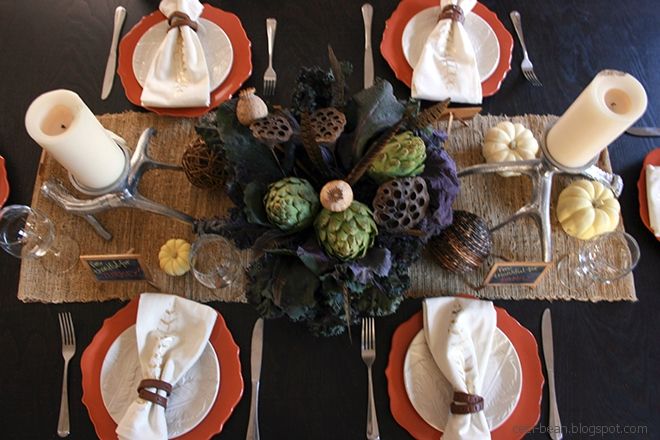
When I created this tablescape, I wanted to focus on natural elements. I pulled out antler candleholders, feather napkins and plates, and pumpkins leftover from Halloween. I brought in wooden decorative balls and a rustic runner, and created napkin rings with more inexpensive belts from Daiso (when I picked up the ones I used for the leather strap hurricane). I just cut them into strips and used some string to tie them together on the back.


For the centerpiece, I opted for a (mostly) edible display. I went through the produce section of my grocery store, picking up artichokes and dark green-purple bunches of kale. I supplemented with the dried seed pods and feathers I always keep on hand. Sadly, I forgot to add water and the kale got a little wilty in the bowl... So, learn from my mistake and remember kale needs water!


Although they weren't natural elements, I had the idea of making little chalkboards for each place setting. I imagined them written with the names of my guests or for each guest to write what they are grateful for. I thought they were the perfect addition to our table.


I think the table turned out nice and casual...just the way I hope Thursday will be! :-)

Edit: click here for a little tutorial on these in case you'd like to add this detail to your own Thanksgiving feast!

Linking up to the Dare to be Thankful Linky Party with Primitive & Proper and the Link Party Palooza with Tatertots and Jello.

Thursday, October 31, 2013

DIY Leather Strap Hurricane for Fall Console

Happy Halloween, everybody. In case you missed it, I shared our costumes and Halloween mantel previously.

I jumped right into the Halloween decor, but now I'm easing my way into some general autumnal adornment. (I really wanted to say "autumness" but I'm told that's not a real word.)


It is pretty simple, but I was trying to use what I had, for the most part. The leather strap hurricane was a super easy DIY project that cost me $3, plus tax. Not too shabby considering other ones I've seen at Front Gate and One Kings Lane (which inspired this in the first place) were priced at $60 to $469 bucks!


I had a vase on hand and only had to purchase 2 pleather belts at Daiso. If you aren't familiar, Daiso is similar to a dollar store, only everything is $1.50 and Japanese. (Note: the link is not to the exact style belts I bought because they don't appear to be available online.)

I cut each belt so it would fit snugly (the material gives a little, so make it as tight as possible.) and poked a hole with the tip of a knife. The curved the ends, although they aren't really visible. Then I cut the remainder of the belt straps in half, giving me four pieces to tuck in diagonally. I snipped the ends at an angle once I knew how long they needed to be. That's pretty much it. I didn't use glue or special hardware or anything.


I like that I can remove the belt pieces if I choose to use the vase in other ways throughout the year.


Other pieces I used for this display included these shuttles (part of an antique loom) that belonged to my grandfather, who worked in textiles.


I also made this little flower arrangement with some hydrangeas, feathers, and dried seed pods.


Anyone else out there moving onto post-Halloween decorating already?